

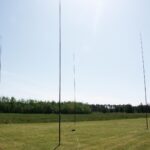
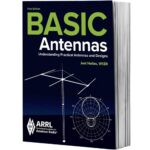
This design is for a multiband horizontal dipole or fan dipole antenna, optimized for NVIS propagation on 80m and 40m, with potential tuning for 60m or 20m using an antenna tuner. The antenna is low to the ground (0.1–0.25 wavelengths) to maximize vertical radiation and is suitable for portable or fixed emergency communications (EMCOMM). It’s inspired by practical designs like the military AS-2259/GR and homebrew solutions from ham radio resources.
Materials Needed
- 150–200 ft of insulated antenna wire (e.g., 14-gauge stranded copper or DX Engineering DXE-ANTW-150) for multiple bands.For 80m: ~66 ft total (33 ft per leg).For 40m: ~33 ft total (16.5 ft per leg).
Center Insulator: A commercial dipole center insulator (e.g., DX Engineering or homebrew with PVC and connectors).End Insulators: 4–6 ceramic or plastic insulators for the dipole ends.Coaxial Feedline: 50–100 ft of RG-8X or RG-58 coax (low loss preferred; keep it short for portable setups).Antenna Tuner: A wide-range tuner (e.g., LDG AT-100ProII) to match impedance across multiple bands.Mast or Support:
- A 10–15 ft telescoping fiberglass mast (e.g., painter’s pole from Lowe’s) or PVC pipe.Alternatively, 4 fiberglass “cammo” poles for portable setups (as per Dr. Carl O. Jelinek’s design).
Ground Wire (Optional): ~5% longer than the dipole (e.g., ~70 ft for 80m) to act as a reflector for improved gain (3–6 dB).Connectors:
- 1 PL-259 connector for the coax.Banana plugs or binding posts for wire connections at the center.
Support Rope: Non-conductive rope (e.g., paracord) for securing dipole ends.Tools:
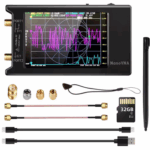
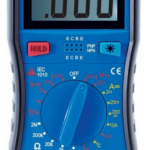
- Soldering iron, wire cutters, crimping tool, SWR meter or antenna analyzer.
Optional:
- 1:1 balun to reduce feedline radiation.EMT conduit (1-1/4″ sections) for a sturdy mast (as per Hackaday’s AS-2259 replica).
Design Considerations
Step-by-Step Build Instructions
- For a multiband dipole, calculate the half-wave dipole length for each band using the formula:
Length (ft) = 468 / frequency (MHz).- 80m (3.5 MHz): ~66 ft total (33 ft per leg).40m (7.0 MHz): ~33 ft total (16.5 ft per leg).60m (5.3 MHz, optional): ~44 ft total (22 ft per leg).
Cut two wires for each band, ensuring each leg is half the total length. Label them to avoid confusion.
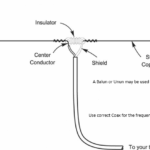
Prepare the Center Insulator:
- Use a commercial center insulator or build one with a PVC cap or plate.Attach a SO-239 connector or binding posts to connect the coax feedline.Secure the wires for each band (80m and 40m) to the insulator, ensuring good electrical connections (solder or crimp).For a fan dipole, connect all dipole wires to the same feedpoint, fanning them out slightly to avoid interaction.
Assemble the Mast:
- For portable setups, use a telescoping fiberglass mast (10–15 ft) or four fiberglass “cammo” poles arranged in a square for stability.For fixed setups, a single PVC or EMT conduit mast (10–15 ft) works well.Secure the mast base with stakes or a weighted base for portability.
Mount the Dipole:
- Attach the center insulator to the top of the mast.Extend the dipole wires horizontally, securing the ends to insulators and tying them off with rope to stakes, trees, or low supports (6–7 ft high).Keep the antenna as flat as possible or configure it as a mild inverted-V (sloping down to ~6 ft at the ends) to maintain high-angle radiation.If using a ground reflector, lay a wire ~5% longer than the dipole (e.g., 70 ft for 80m) directly beneath it on the ground.
Connect the Feedline:
- Attach the coaxial feedline to the center insulator (via SO-239 or direct connection).Use a 1:1 balun at the feedpoint to minimize feedline radiation (optional but recommended).Run the coax to your radio, keeping it as short as possible to reduce losses (e.g., <50 ft for portable setups).
Tune the Antenna:
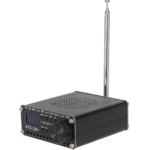
- Connect the coax to an antenna tuner and then to your HF radio (e.g., Icom 7300 or Yaesu FT-857D).Test the antenna on the 40m band (e.g., 7.1 MHz) using an SWR meter or antenna analyzer.Adjust the wire lengths slightly (trim or fold back) to achieve an SWR of 1.5:1 or better.Test on 80m (e.g., 3.8 MHz) and other bands. The tuner should handle minor mismatches, allowing multiband operation.Note: Without a tuner, the antenna may only resonate well on the designed bands (80m and 40m).
Optional Ground Reflector:
- Lay a single ground wire (e.g., 70 ft for 80m) directly under the dipole, parallel to it, on the ground.This acts as a reflector, increasing gain by 3–6 dB and stabilizing the radiation pattern.
Test and Deploy:
- Test the antenna on 40m and 80m during daylight and nighttime to confirm NVIS performance (100–300 mile range).Use low power (e.g., 5–100 W) to verify contacts within the target range.For EMCOMM, set up pre-arranged frequencies and schedules with other stations for reliable communication.
Performance Tips
Total 2 Votes
0
2
Tell us how can we improve this post?

Hi I am Marcus, MM0ZIF, a licenced Radio Amateur, Doctor of Musicology, amateur weather enthusiast. I over the years have been a Amateur Radio Tutor, Examiner, and a Regional Manager for the Radio Society of Great Britain.
This site is dedicated more towards Amateur Radio and Weather, with an angle on Technology too. I also maintain https://havenswell.com/ which is my other blog which is more aimed at cooking, hobbies and life in general as well as businness and networking.
- MM0ZIF

- MM0ZIF

- MM0ZIF
- MM0ZIF

- MM0ZIF

- MM0ZIF
- MM0ZIF
- MM0ZIF
- MM0ZIF
- MM0ZIF

- MM0ZIF

- MM0ZIF

- MM0ZIF
- MM0ZIF
- MM0ZIF
- MM0ZIF

- MM0ZIF
- MM0ZIF

- MM0ZIF

- MM0ZIF

- MM0ZIF

- MM0ZIF
- MM0ZIF

- MM0ZIF

- MM0ZIF

- MM0ZIF

- MM0ZIF
- MM0ZIF

- MM0ZIF

- MM0ZIF
- MM0ZIF

- MM0ZIF

- MM0ZIF

- MM0ZIF
- MM0ZIF
- MM0ZIF
- MM0ZIF

- MM0ZIF
- MM0ZIF
- MM0ZIF

- MM0ZIF
- MM0ZIF

- MM0ZIF

- MM0ZIF
- MM0ZIF
- MM0ZIF

- MM0ZIF

- MM0ZIF
- MM0ZIF

- MM0ZIF

- MM0ZIF
- MM0ZIF
- MM0ZIF
- MM0ZIF
- MM0ZIF
- MM0ZIF
- MM0ZIF
- MM0ZIF

- MM0ZIF
- MM0ZIF

- MM0ZIF
- MM0ZIF
- MM0ZIF

- MM0ZIF
- MM0ZIF

- MM0ZIF

- MM0ZIF

- MM0ZIF

- MM0ZIF

- MM0ZIF

- MM0ZIF

- MM0ZIF

- MM0ZIF

- MM0ZIF

- MM0ZIF

- MM0ZIF

- MM0ZIF

- MM0ZIF

- MM0ZIF
- MM0ZIF
- MM0ZIF

- MM0ZIF

- MM0ZIF

- MM0ZIF

- MM0ZIF

- MM0ZIF
- MM0ZIF
- MM0ZIF
- MM0ZIF
- MM0ZIF
- MM0ZIF
- MM0ZIF
- MM0ZIF
- MM0ZIF
- MM0ZIF
- MM0ZIF
- MM0ZIF

- MM0ZIF

- MM0ZIF

- MM0ZIF

- MM0ZIF

- MM0ZIF

- MM0ZIF

- MM0ZIF

- MM0ZIF
- MM0ZIF

- MM0ZIF

- MM0ZIF

- MM0ZIF

- MM0ZIF

- MM0ZIF
- MM0ZIF

- MM0ZIF

- MM0ZIF

- MM0ZIF

- MM0ZIF
- MM0ZIF

- MM0ZIF

- MM0ZIF

- MM0ZIF
- MM0ZIF

- MM0ZIF

- MM0ZIF

- MM0ZIF
- MM0ZIF
- MM0ZIF

- MM0ZIF

- MM0ZIF

- MM0ZIF
- MM0ZIF
- MM0ZIF

- MM0ZIF

- MM0ZIF

- MM0ZIF

- MM0ZIF

- MM0ZIF

- MM0ZIF

- MM0ZIF
- MM0ZIF

- MM0ZIF

- MM0ZIF

- MM0ZIF

- MM0ZIF

- MM0ZIF
- MM0ZIF
- MM0ZIF

- MM0ZIF

- MM0ZIF
- MM0ZIF
- MM0ZIF
- MM0ZIF
- MM0ZIF
- MM0ZIF

- MM0ZIF
- MM0ZIF
- MM0ZIF

- MM0ZIF
- MM0ZIF

- MM0ZIF

- MM0ZIF
- MM0ZIF
- MM0ZIF
- MM0ZIF

- MM0ZIF
- MM0ZIF
- MM0ZIF

- MM0ZIF

- MM0ZIF

- MM0ZIF

- MM0ZIF
- MM0ZIF

- MM0ZIF
- MM0ZIF
- MM0ZIF
- MM0ZIF

- MM0ZIF
- MM0ZIF

- MM0ZIF
- MM0ZIF


