

In the ever-evolving landscape of amateur radio, digital modes have become a gateway to global communication. If you’re looking to dive into this fascinating world, combining an MMDVM (Multi-Mode Digital Voice Modem) with a Raspberry Pi 3B and Pi-Star OS is a fantastic way to get started. This setup allows you to access various digital voice modes, including D-STAR, DMR, YSF, P25, and NXDN, all from the comfort of your home.
What is MMDVM?
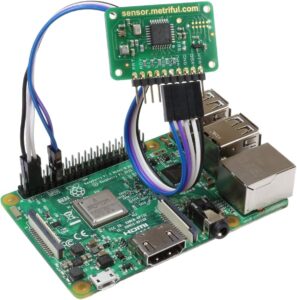
MMDVM stands for Multi-Mode Digital Voice Modem. It’s a versatile piece of hardware that acts as your personal digital voice repeater and gateway. With an MMDVM hotspot, you can connect to digital voice systems worldwide, even if you don’t have a digital repeater nearby. The MMDVM board I bought came from AliExpress because I am a tight Scotsman, and the pennies matter! Before installing the board I had to first fit the antenna connector onto the board (five points of solder) which is easy enough for anyone who knows which end of the Soldering Iron is hot (Pronounced Sol-der-ing). Be aware that even with a minimalist project like this a Iron holder is essential! also remember to put down something to stop you from burning your desk (I use a large art and craft cutting board). The actual install of the HaT is simple press firmly down after aligning the pins on the board.
Why Raspberry Pi 3B?
The Raspberry Pi 3B is a powerful yet affordable single-board computer that’s perfect for running Pi-Star OS. Its compact size, built-in Wi-Fi, and Ethernet port make it an ideal choice for setting up a digital voice hotspot. If you fancied building this with a different board like the PiZero, or OrangePi that would work too
If you wanted to try something different you could use a Pi Zero 2w and tether it to your phone to use mobile, as the whole project is tiny. But be aware if your out of 4g reception range, or have a data cap this could be a problem.
Setting Up Your MMDVM Hotspot
Here’s a step-by-step guide to setting up your MMDVM hotspot with a Raspberry Pi 3B and Pi-Star OS:
- Gather Your Components:
- Raspberry Pi 3B
- MMDVM board (often referred to as a HAT – Hardware Attached on Top)*
- MicroSD card (at least 16GB)
- Power supply for the Raspberry Pi
- Case for the Raspberry Pi and MMDVM board
- Internet connection (Wi-Fi or Ethernet)
- Install Pi-Star OS:
- Download the latest Pi-Star image from the Pi-Star website.
- Use a tool like Balena Etcher or Rufus to flash the Pi-Star image onto your MicroSD card.
- Insert the MicroSD card into your Raspberry Pi and power it up.
- Initial Configuration:
- Connect to the Pi-Star Wi-Fi network (SSID:
Pi-Star-Setup). - Open a web browser and navigate to
http://pi-star.local/to access the Pi-Star dashboard. - Follow the setup wizard to configure your hotspot, including setting your callsign, selecting your preferred digital modes, and connecting to your home Wi-Fi network.
- Connect to the Pi-Star Wi-Fi network (SSID:
- Register for a BrandMeister ID:
- If you’re using DMR, you’ll need a BrandMeister ID. Register at the BrandMeister website.
- Once you have your ID, configure it in the Pi-Star dashboard. I might actually suggest this should be the first thing you do, as if you are re-registering an account it can take a little longer!
- Configure Your Radio:
- Set your radio to the same frequency as your hotspot (typically a 70cm simplex frequency).
- Program your radio with the necessary settings for the digital mode you’re using.
- Enjoy Digital Modes:
- With everything set up, you can now use your digital radio to connect to digital voice networks worldwide. Whether you’re chatting on D-STAR, DMR, or YSF, your MMDVM hotspot will handle the rest.
What is Pi-Star?
Pi-Star is a custom, pre-configured SD card image that simplifies the setup and management of digital voice hotspots and repeaters. It supports multiple digital voice modes, including DMR, D-STAR, YSF, P25, NXDN, and POCSAG. The software is designed to be accessible for beginners while offering advanced configuration options for experienced users2.
Key Features of Pi-Star
- Multi-Mode Support: Pi-Star can handle various digital voice modes, making it a versatile solution for amateur radio enthusiasts.
- User-Friendly Interface: The web-based dashboard provides an easy-to-use interface for configuring and managing your hotspot or repeater.
- Cross-Mode Gateways: Pi-Star supports cross-mode gateways, allowing communication between different digital voice modes.
- Regular Updates: The software is regularly updated to include new features and improvements, ensuring it stays current with the latest developments in digital voice communication.
- Community Support: Pi-Star has a strong community of users and developers who provide support and share their experiences.
Conclusion
Setting up an MMDVM hotspot with a Raspberry Pi 3B and Pi-Star OS is a rewarding project that opens up a world of digital communication. Whether you’re a seasoned ham or a newcomer to digital modes, this setup provides a flexible and powerful way to explore the digital voice landscape. So, grab your gear, follow the steps, and start connecting with hams around the globe!
- Home – pistar.uk
- What You Need to Know About MMDVM Hotspots
I may one day make a penny or two from Affiliate links, when that day comes I will post about it, until then. Do not hold your breath!
Tell us how can we improve this post?

Hi I am Marcus, MM0ZIF, a licenced Radio Amateur, Doctor of Musicology, amateur weather enthusiast. I over the years have been a Amateur Radio Tutor, Examiner, and a Regional Manager for the Radio Society of Great Britain.
This site is dedicated more towards Amateur Radio and Weather, with an angle on Technology too. I also maintain https://havenswell.com/ which is my other blog which is more aimed at cooking, hobbies and life in general as well as businness and networking.
- MM0ZIFhttps://mm0zif.radio/current/author/nimda_marcus/

- MM0ZIFhttps://mm0zif.radio/current/author/nimda_marcus/
- MM0ZIFhttps://mm0zif.radio/current/author/nimda_marcus/

- MM0ZIFhttps://mm0zif.radio/current/author/nimda_marcus/


