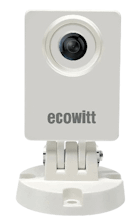
The package the camera is contained in is a deminuative 12cm x 15cm x 5.7cm, Wow I wasn’t expecting it to be quite so small. Inside the box is the camera it’s self, a 5m power lead and a pair of Screws and a quickstart guide.
Specifications
| Maximum Image Transfer Rate | Ecowitt server | 5 minutes per upload |
| Custom mode HTTP get query | 5s per upload | |
| ftp server | TBA | |
| Dimensions | 41*41*71.5mm | |
| Waterproof | IP66 | |
| FOV | 150° | |
| Pixel Size | 1600×1200, 1280×1024, 1024×768, 800×600, 400×296, 320×240, 160×120, | |
| Power supply | 5V⎓1A | |
| Operate Temperature | 0 ~ 50 °C | |
| WiFi | 802.11b/g/n | |
Connection between camera and Wi-Fi router
Transmission distance in open field: 30 m (100 ft.) depending on router and environment
Wi-Fi Frequency: 2.4 GHz
WLAN: 802.11 b/g/n
Parts List
1* Wittcam (HP10)
1* USB Power cord(Length=5M PIN=2)
Weight: 250g
Battery: None
Setup
Following the double sided A4 instructions it was easy to set up the HP10 to access the network, it is very simple. Once the network was established, I could log into the devices own webserver page and check the image, select if I wanted to record just during day time or 24 hours a day. it also gives you the option to Disable the web interface on the device too. I 100% recommend disabling the web interface on the device once it is set up to stop people trying to usurp control of the device.
Following the setup of the networking I needed to visit Ecowitt.net to configure the last of the easy settings. This is within the same API as used for the GW1*** series weather instruments.
Next is the software setup to get the images from the HP10 camera, to within the reporting to package, which is this case is Weather Display. Within Weather Display the webcam setup is straight forwards. I am currently working on intergrating the static pictures and video into the website.
Well the HP10 is finally up on a temporary mast, and I am now working out exactly how it works. As you will notice from the first day timelapse, I had to change a few things in the setup during the day. It did not help that yesterday was a busy day and I didn’t have an awful lot of time at home to work with the settings straight off. But here is the video.
As you can see I ended up shifting the planes around a little during the day. Whilst I am now generating video it is not embedded into the weather station feed yet. For the main weather data click here.
If you would like to purchase your own Ecowitt HP10, which doesn’t require anything else except an Wifi connection, they are available here By purchasing through this link you are helping support the expansion of this site.
Hi I am Marcus, MM0ZIF, a licenced Radio Amateur, Doctor of Musicology, amateur weather enthusiast. I over the years have been a Amateur Radio Tutor, Examiner, and a Regional Manager for the Radio Society of Great Britain.
This site is dedicated more towards Amateur Radio and Weather, with an angle on Technology too. I also maintain https://havenswell.com/ which is my other blog which is more aimed at cooking, hobbies and life in general as well as businness and networking.

